« Older: Hello World... « Older
Newer: Automatic Inner Shadows »Newer »
Inner Shadow Drawing
Recently at work while I was designing some user interface elements, I found that to make the elements look correct for iOS 6 you need to either indent, or emboss them; For instance the buttons on the iOS keyboard are embossed.
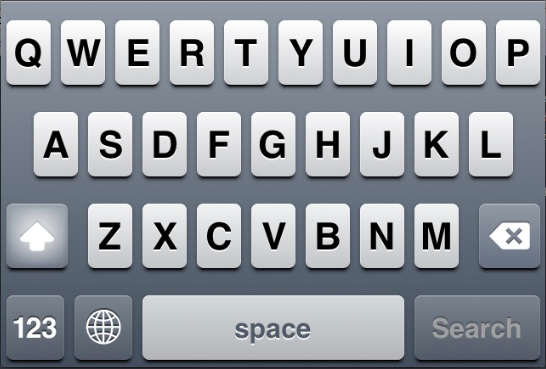
This requires two lots of shadows, there is a very obvious shadow at the bottom of each of the buttons, and there is also a white shadow running across the top. This is much more obvious on the darker grey buttons. To get the same effect on your own drawing you either need to draw a white line across the top of embossed elements, or set things up so there is a white shadow generated across the top of the element.
We can overide the drawRect: method of a UIView subclass to
draw something that looks like a keyboard button. First let’s
create a path to make a rounded rect (we will reuse this
path again later):
  // We want to draw our rect far enough into the view that our shadow
  // doesn't get clipped.
  CGSize outsideShadowSize = [self outsideShadowSize];
  CGMutablePathRef shape = CGPathCreateMutable ();
  float indent = outerShadowSize.height < outerShadowSize.width
  CGFloat leftEdge = CGRectGetMinX (rect) + indent;
  CGFloat rightEdge = CGFloatGetMaxX (rect) - indent;
  CGFloat topEdge = CGFloatGetMinY (rect) + indent;
  CGFloat bottomEdge = CGFloatGetMaxY (rect) - indent;
   // Draw the path for the rounded rect (or whatvever shape you like to
  // be indented or embossed.)
  CGPathMoveToPoint (shape, NULL, rightEdge - cornerRadius, topEdge);
  // ArcToPoint probably requires a blog post of it's own with some pretty
  // diagrams.
   CGPathAddArcToPoint (shape, NULL,
                       leftEdge, topEdge,
                       leftEdge, topEdge + cornerRadius,
                       cornerRadius);
  CGPathAddArcToPoint (shape, NULL,
                       leftEdge, bottomEdge,
                       leftEdge + cornerRadius, bottomEdge,
                       cornerRadius);
  CGPathAddArcToPoint (shape, NULL,
                       rightEdge, bottomEdge,
                       rightEdge, bottomEdge - indent,
                       cornerRadius);
  CGPathAddArcToPoint (shape, NULL,
                       rightEdge, topEdge,
                       rightEdge - cornerRadius, topEdge,
                       cornerRadius);
  CGPathCloseSubpath (shape);
Next we need to get the context that we are going to draw with and set it up to draw a button. Before setting up the context we should save its state that way at the end of the drawRect method we can restore its state, and any changes that we’ve made to the context won’t be passed on.
  CGFloat radius = [self outsideShadowRadius];
  CGContextRef ctx = UIGraphicsGetCurrentContext ();
  CGContextSaveGState (ctx);
  CGColorRef outsideShadowColor = [self outsideShadowColor];
  CGContextSetShadowWithColor (ctx, outerShadowSize, radius,
                               outsideShadowColor);
  CGContextSetFillColorWithColor (ctx, outsideShadowColor);
  CGContextAddPath (shape);
  // This makes the shadow.
  CGContextFillPath (ctx);
   // If we want something different drawn over the top do so now.
  CGContextAddPath (shape);
  // To draw a gradient we clip the are that we want drawn, first.
  CGContextClip (ctx);
  // Carefully looking at the buttons on the keyboard reveals that they have
     a gradient from the top of the button to the bottom.
  CGColorSpaceRef rgbSpace = CGColorSpaceCreateDeviceRGB ();
  CGFloat gradVals[] = { 130.0 / 255.0, 140.0 / 255.0, 150.0 / 255.0, 1.0, 90.0 / 255.0, 100 / 255.0, 110.0 / 255.0, 1.0 };
  CGGradientRef grad = CGGradientCreateWithColorComponents (gradVals,
  CGContextDrawLinearGradient (ctx,
                               grad,
                               CGPointMake (0, topEdge),
                               CGPointMake (0, bottomEdge));
  CFRelease (grad);
Finally we need to make the inside shadow. We will use the Non-zero winding rule (see the Filling a Path section of the Quartz2D Programming Guide) to fill only areas that our outside of the path. To do this we will make a new path in the context by drawing a closed rect in an anti-clockwise direction around the outside of our shape (which was drawn in a clockwise direction). We will then add the original path to the path for the rect, and fill the shape.
  // Now lets do the inside shadow! Draw a rect arround the outside of our
  // original path but in the oposite direction close this rect, then add the
  // original shape to our path. When we fill the path the Zero Winding Rule
  // will mean that we only fill in the area bewteen the rect and the original
  // shape.
   CGFloat pathWidth = [self insideShadowRadius];
  CGSize shadowSize = [self insideShadowSize];
  CGFloat shadowWidthAbs = fabs (shadowSize.width);
  CGFloat shadowHeightAbs = fabs (shadowSize.height);
  pathWidth += shadowHeightAbs > shadowWidthAbs ? shadowHeightAbs : shadowWidthAbs;
   CGFloat halfPathWidth = 0.5 * pathWidth;
  topEdge = yMin + indent - halfPathWidth;
  bottomEdge = yMax - indent + halfPathWidth;
  leftEdge = xMin + indent - halfPathWidth;
  rightEdge = xMax - indent + halfPathWidth;
   // Use the winding Rule to fill in an area arround our inital shade. The
  // default winding rule is the non-zero winding rule which will do exactly
  // what we want.
   CGContextAddRect (ctx, CGRectMake (rightEdge, bottomEdge,
                                     leftEdge - rightEdge, topEdge - bottomEdge));
  CGContextAddPath (ctx, shape);
  // Make sure the fill color has an alpha of 1, otherwise it will affect
  // the alpha of the shadow which is drawn.
  CGFloat  fillColorVals[] = { 0.0, 0.0, 0.0, 1.0 };
  CGColorRef fillColor = CGColorCreate  (rgbSpace,
                                         fillColorVals);
   CGContextSetFillColorWithColor (ctx, fillColor);
  CGContextSetShadowWithColor (ctx, shadowSize,
                               [self insideShadowRadius], [self insideShadowCol]);
  CGContextFillPath (ctx);
  CFRelease (shape);
  CFRelease (fillColor);
  CFRelease (rgbSpace);
   // Restore the graphics context to its original state.
  CGContextRestoreGState (ctx);
Another approach would be to try and draw a path exactly arround the outside of our shape. There are a couple of drawbacks to doing this. Firstly if the shape is complicated, or contains any holes in the middle then it may take some time to work out and code the paths that you need to draw. Secondly because you aren’t using the same path as your original shape (you’re drawing a line at half lines width away), there may be small differeces in which pixels are drawn at the edge, this may result in aliasing effects.
So here is the result of all of the work that we have done:

As well as making items appear above the surface we can quickly use the same code to embed things into a surface. With a few minor changes we can make this:
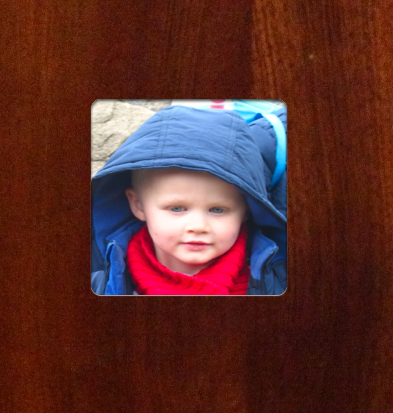
This is made with a photo of my door, son, and the code above (although I’m not sure if a photo of the code above will do a lot of good). To draw a inner shadow in a layer like this is a lot of work. In the next post I plan to give a more general solution to this problem.
You can find the source for this code here.